
 Início
 》》》》》》》
1 Tutorials ZBrush Model, Sculpt and Texture a Demon-like Monster in 3ds Max and ZBrush – Day 2 Sex Jan 28, 2011 6:19 am
Admin

Admin
Final Product What You'll Be Creating

//This is a multi-part tutorial on creating a Demon-like ‘Lok
Warrior’ with realistic muscle anatomy. In the first day of this
tutorial we created a base mesh for our character using poly modeling.
Today we will take this mesh into ZBrush and sculpt intricate muscle
anatomy. On day three we will texture the creature and add the
finishing touches to the artwork.
Let’s begin day 2 of this tutorial.
Step 40
Open ZBrush and click on ‘Import an OBJ file’. Select our exported
object (this way you don’t need to drag the object into the ZBrush
workspace) and select ‘Edit mode’.
Step 41
Now subdivide the model by clicking Cntrl + D to create more
polygons. Press X to select a symmetrical brush and start sculpting the
torso while holding down the Alt key on your keyboard. The red lines
below are where you have to sculpt while holding down the Alt key. The
blue areas are where you have to sculpt without holding the Alt key
down. Please pay attention to the brush size and Z intensity too.
Step 42
Use this image as a guide when preparing the back.
Step 43
We will finish the front part of the torso first. Press Ctrl + D
again and now we are on subdivision level 3. Try to form the chest and
stomach muscles using the inflat brush. You can increase the Draw size
and Z intensity if necessary.
Step 44
Please use my earlier instructions as a guide for this area. Again
use Ctrl + D and continue sculpting the torso with a smaller draw size.
Step 45
Try to add more details to the torso at this level and begin sculpting the hands.
Step 46
Take a deep look at the muscle anatomy to make sure it is realistic.
If unsure about any areas, you can find many reference images by
searching the net or in anatomy books at your local library. Here are a
few good references:

Step 47
Subdivide one more time. Now we’re on level 5 but be careful not to
go higher than level 6 because this may result in more polygons than
ZBrush and your computer can handle. We will use ZBrush and the HD
feature for very small details (like skin details) later. On level 5
try to sculpt more small areas around the stomach.
Step 48
Now press Shift + D two times, so that we are working in level 3.
Start to add back muscles. Draw size and intensity is very important
here.
Step 49
Refine the details by pressing ‘D’ and going into level 4. Add in more small details in level 5.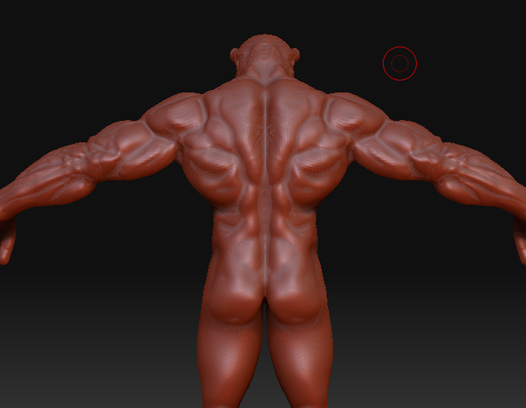
Step 50
Go to level 3 and use the ‘Move’ tool to make the muscles thicker
and bigger. Switch to level 5 and see the difference. Try to get the
best result by switching between levels and using move and inflat
brushes.
Step 51
Add details to fingers using the ‘Elastic brush’ with a small draw size.
Step 52
Now begin sculpting the head, forming the horns, cheeks, ears and other face details in level 4.
Step 53
Subdivide again to level 6. Now we can add more details to the head and add veins as well.
Step 54
Try to add more small details by using the ‘Elastic brush’ on the
torso area and hands. After that, level down to level 3 or 4 and start
forming the leg muscles. As you can see, in this example the muscles
are different from human leg muscles because we are creating a monster!
Step 55
Form the knee area and the front part of the leg. Add more details on the foot (level 4).
Step 56
Start sculpting the back part of leg and add muscles on level 4 using the inflat brush.
Step 57
Now we are going to add very fine details using the ZBrush HD
feature. When you are done with your small details on level 6, click on
Geometry HD > divideHD and divide it two times. OR if you have a
powerful computer, do it for level 3 of HD, then click ‘Sculpt HD’ and
wait.
When the process has finished, move your mouse to the area that you
want to add final details to and press the ‘A’ button on your keyboard.
Select the standard brush with an alpha and make sure your current
stroke is DragRect. Start adding the skin detail for that area of the
body with Z intensity set to 5 by dragging the alpha.
Step 58
To see more details, change your material to RS_gretClayExtreme. When you are done press ‘A’ again.
Step 59
Add fine details to the knee and elbow areas, like veins and creases.
Step 60
Add details to all other parts of the body. For bigger areas, drag
your alpha more and for smaller areas, drag in a few times to make it
look more natural. Now you have a very detailed monster model. ]
]
//This is a multi-part tutorial on creating a Demon-like ‘Lok
Warrior’ with realistic muscle anatomy. In the first day of this
tutorial we created a base mesh for our character using poly modeling.
Today we will take this mesh into ZBrush and sculpt intricate muscle
anatomy. On day three we will texture the creature and add the
finishing touches to the artwork.
Let’s begin day 2 of this tutorial.
Step 40
Open ZBrush and click on ‘Import an OBJ file’. Select our exported
object (this way you don’t need to drag the object into the ZBrush
workspace) and select ‘Edit mode’.
Step 41
Now subdivide the model by clicking Cntrl + D to create more
polygons. Press X to select a symmetrical brush and start sculpting the
torso while holding down the Alt key on your keyboard. The red lines
below are where you have to sculpt while holding down the Alt key. The
blue areas are where you have to sculpt without holding the Alt key
down. Please pay attention to the brush size and Z intensity too.
Step 42
Use this image as a guide when preparing the back.
Step 43
We will finish the front part of the torso first. Press Ctrl + D
again and now we are on subdivision level 3. Try to form the chest and
stomach muscles using the inflat brush. You can increase the Draw size
and Z intensity if necessary.
Step 44
Please use my earlier instructions as a guide for this area. Again
use Ctrl + D and continue sculpting the torso with a smaller draw size.
Step 45
Try to add more details to the torso at this level and begin sculpting the hands.
Step 46
Take a deep look at the muscle anatomy to make sure it is realistic.
If unsure about any areas, you can find many reference images by
searching the net or in anatomy books at your local library. Here are a
few good references:
- Strong-man frontal muscle anatomy
- Anatomy for 3D artists
- ZBrush Human Anatomy
Step 47
Subdivide one more time. Now we’re on level 5 but be careful not to
go higher than level 6 because this may result in more polygons than
ZBrush and your computer can handle. We will use ZBrush and the HD
feature for very small details (like skin details) later. On level 5
try to sculpt more small areas around the stomach.
Step 48
Now press Shift + D two times, so that we are working in level 3.
Start to add back muscles. Draw size and intensity is very important
here.
Step 49
Refine the details by pressing ‘D’ and going into level 4. Add in more small details in level 5.
Step 50
Go to level 3 and use the ‘Move’ tool to make the muscles thicker
and bigger. Switch to level 5 and see the difference. Try to get the
best result by switching between levels and using move and inflat
brushes.
Step 51
Add details to fingers using the ‘Elastic brush’ with a small draw size.
Step 52
Now begin sculpting the head, forming the horns, cheeks, ears and other face details in level 4.
Step 53
Subdivide again to level 6. Now we can add more details to the head and add veins as well.
Step 54
Try to add more small details by using the ‘Elastic brush’ on the
torso area and hands. After that, level down to level 3 or 4 and start
forming the leg muscles. As you can see, in this example the muscles
are different from human leg muscles because we are creating a monster!
Step 55
Form the knee area and the front part of the leg. Add more details on the foot (level 4).
Step 56
Start sculpting the back part of leg and add muscles on level 4 using the inflat brush.
Step 57
Now we are going to add very fine details using the ZBrush HD
feature. When you are done with your small details on level 6, click on
Geometry HD > divideHD and divide it two times. OR if you have a
powerful computer, do it for level 3 of HD, then click ‘Sculpt HD’ and
wait.
When the process has finished, move your mouse to the area that you
want to add final details to and press the ‘A’ button on your keyboard.
Select the standard brush with an alpha and make sure your current
stroke is DragRect. Start adding the skin detail for that area of the
body with Z intensity set to 5 by dragging the alpha.
Step 58
To see more details, change your material to RS_gretClayExtreme. When you are done press ‘A’ again.
Step 59
Add fine details to the knee and elbow areas, like veins and creases.
Step 60
Add details to all other parts of the body. For bigger areas, drag
your alpha more and for smaller areas, drag in a few times to make it
look more natural. Now you have a very detailed monster model.
]


